Exercise 01
Send Emails and Texts Programmatically
Learning Objectives
- Installing and loading/attaching packages
- Introducing functions and arguments
- Introducing the pipe (
|>or%>%) operator
Preliminary Steps
NOTE: The most challenging thing about the exercise below is to get the authentication correct for accessing an SMTP server to send a message. It is often easy to get the R code to work correctly to contact a servers, but then to have the server not be able to send out an email.
The example below should allow you to send emails via R using credentials associated with a personal or university Google Gmail account.
If you have a Google Gmail account (either a personal one, e.g., <username>@gmail.com, or one associated with UT, e.g., a <username>@utexas.edu account), you should follow the steps below to create an “app password” that you can use for authentication.
NOTE: For this process to work smoothly, you should also have “2-Step Verification” established for the account.
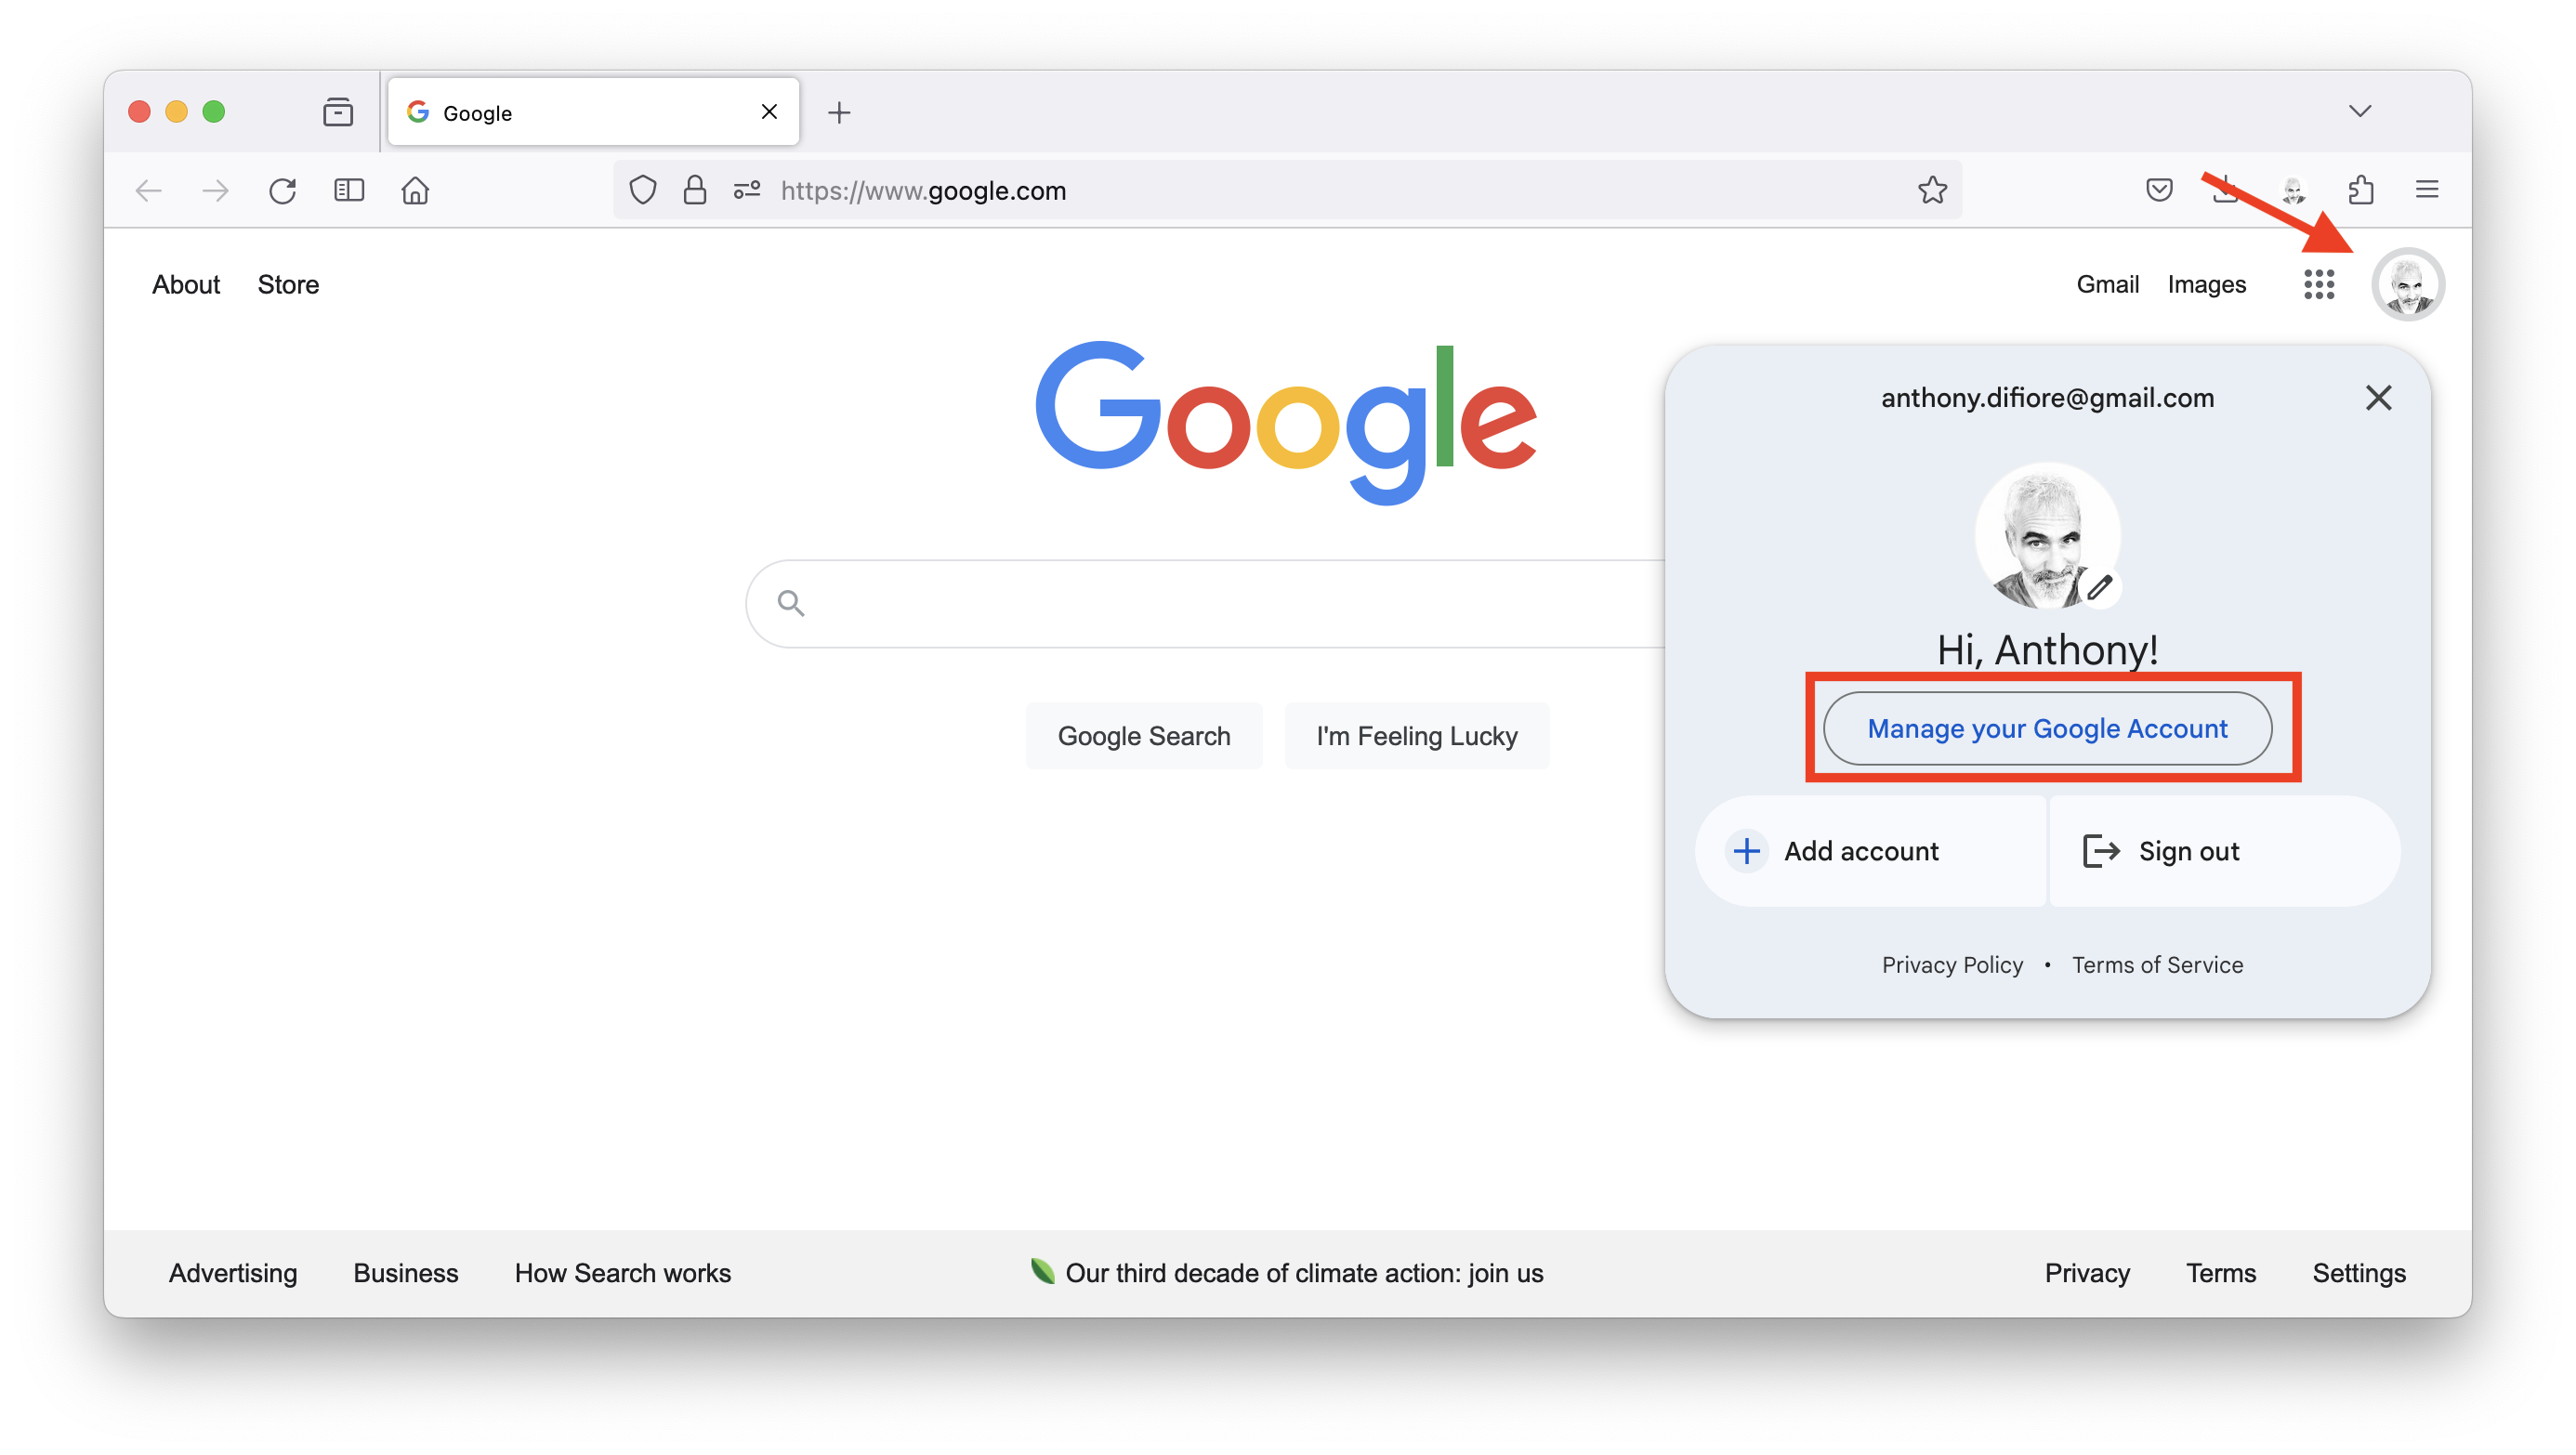
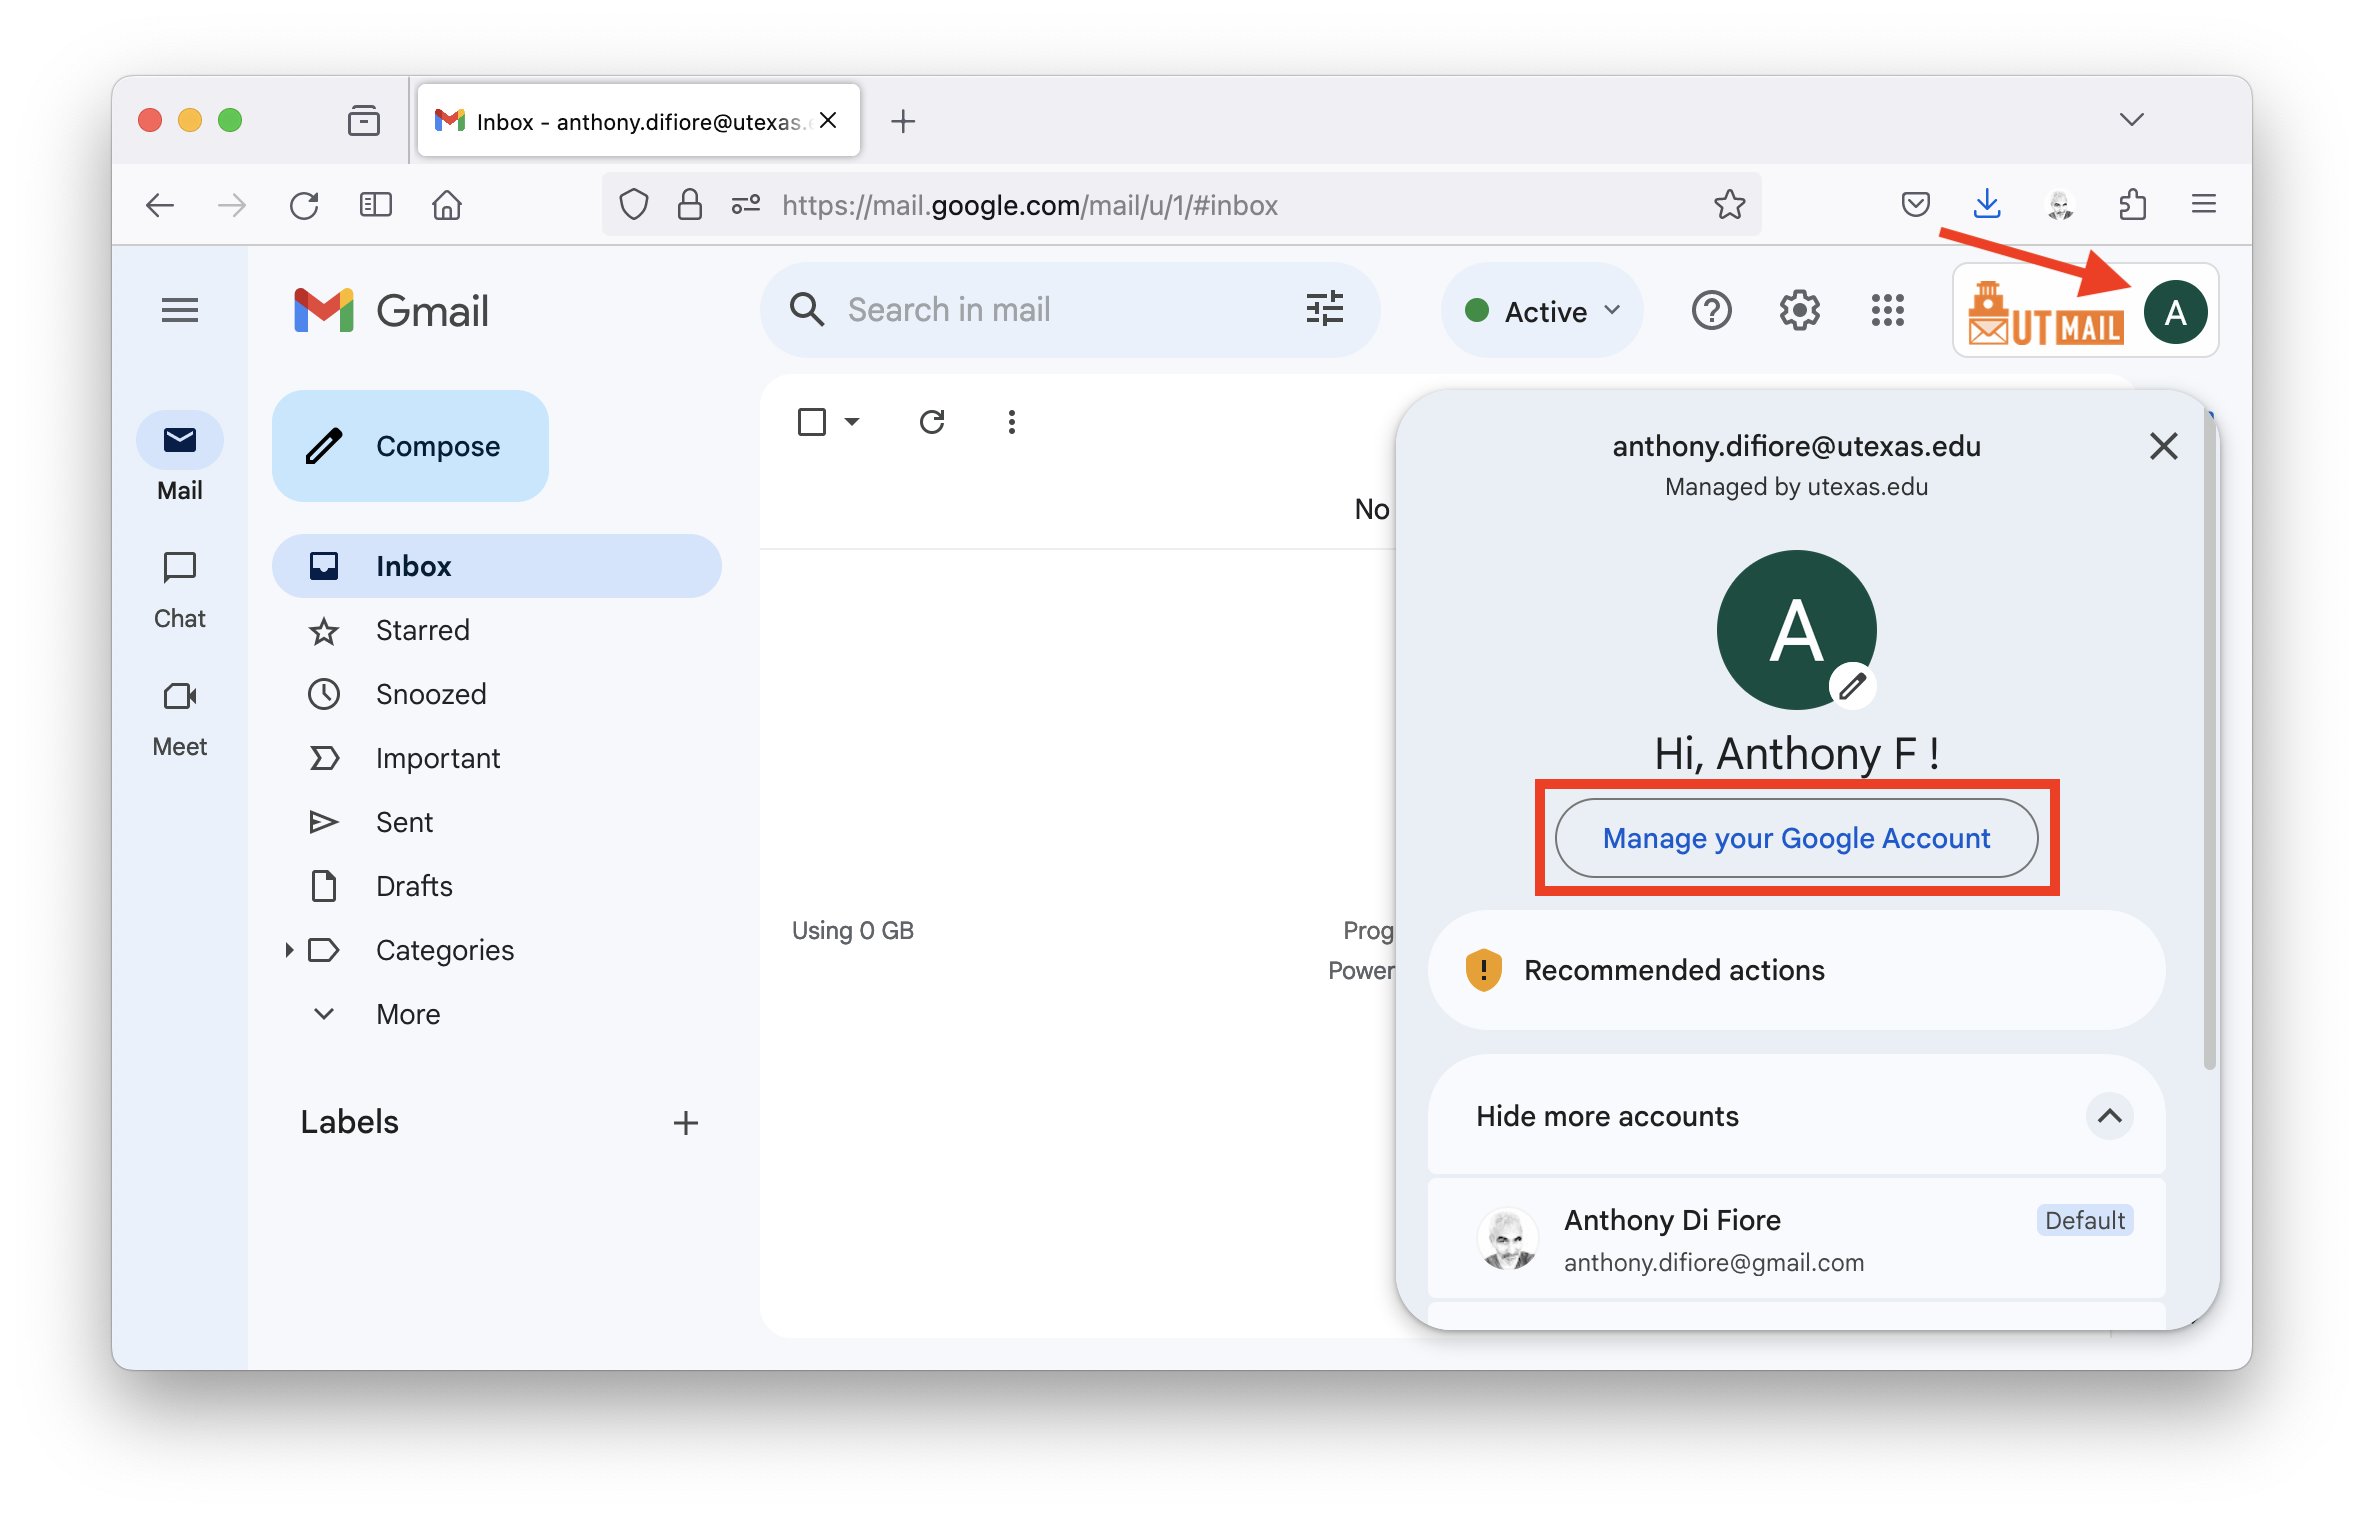
- Log into your Google account or your UT Gmail account on a web browser, click on your user icon and choose “Manage your Google Account”. For example…
… OR …
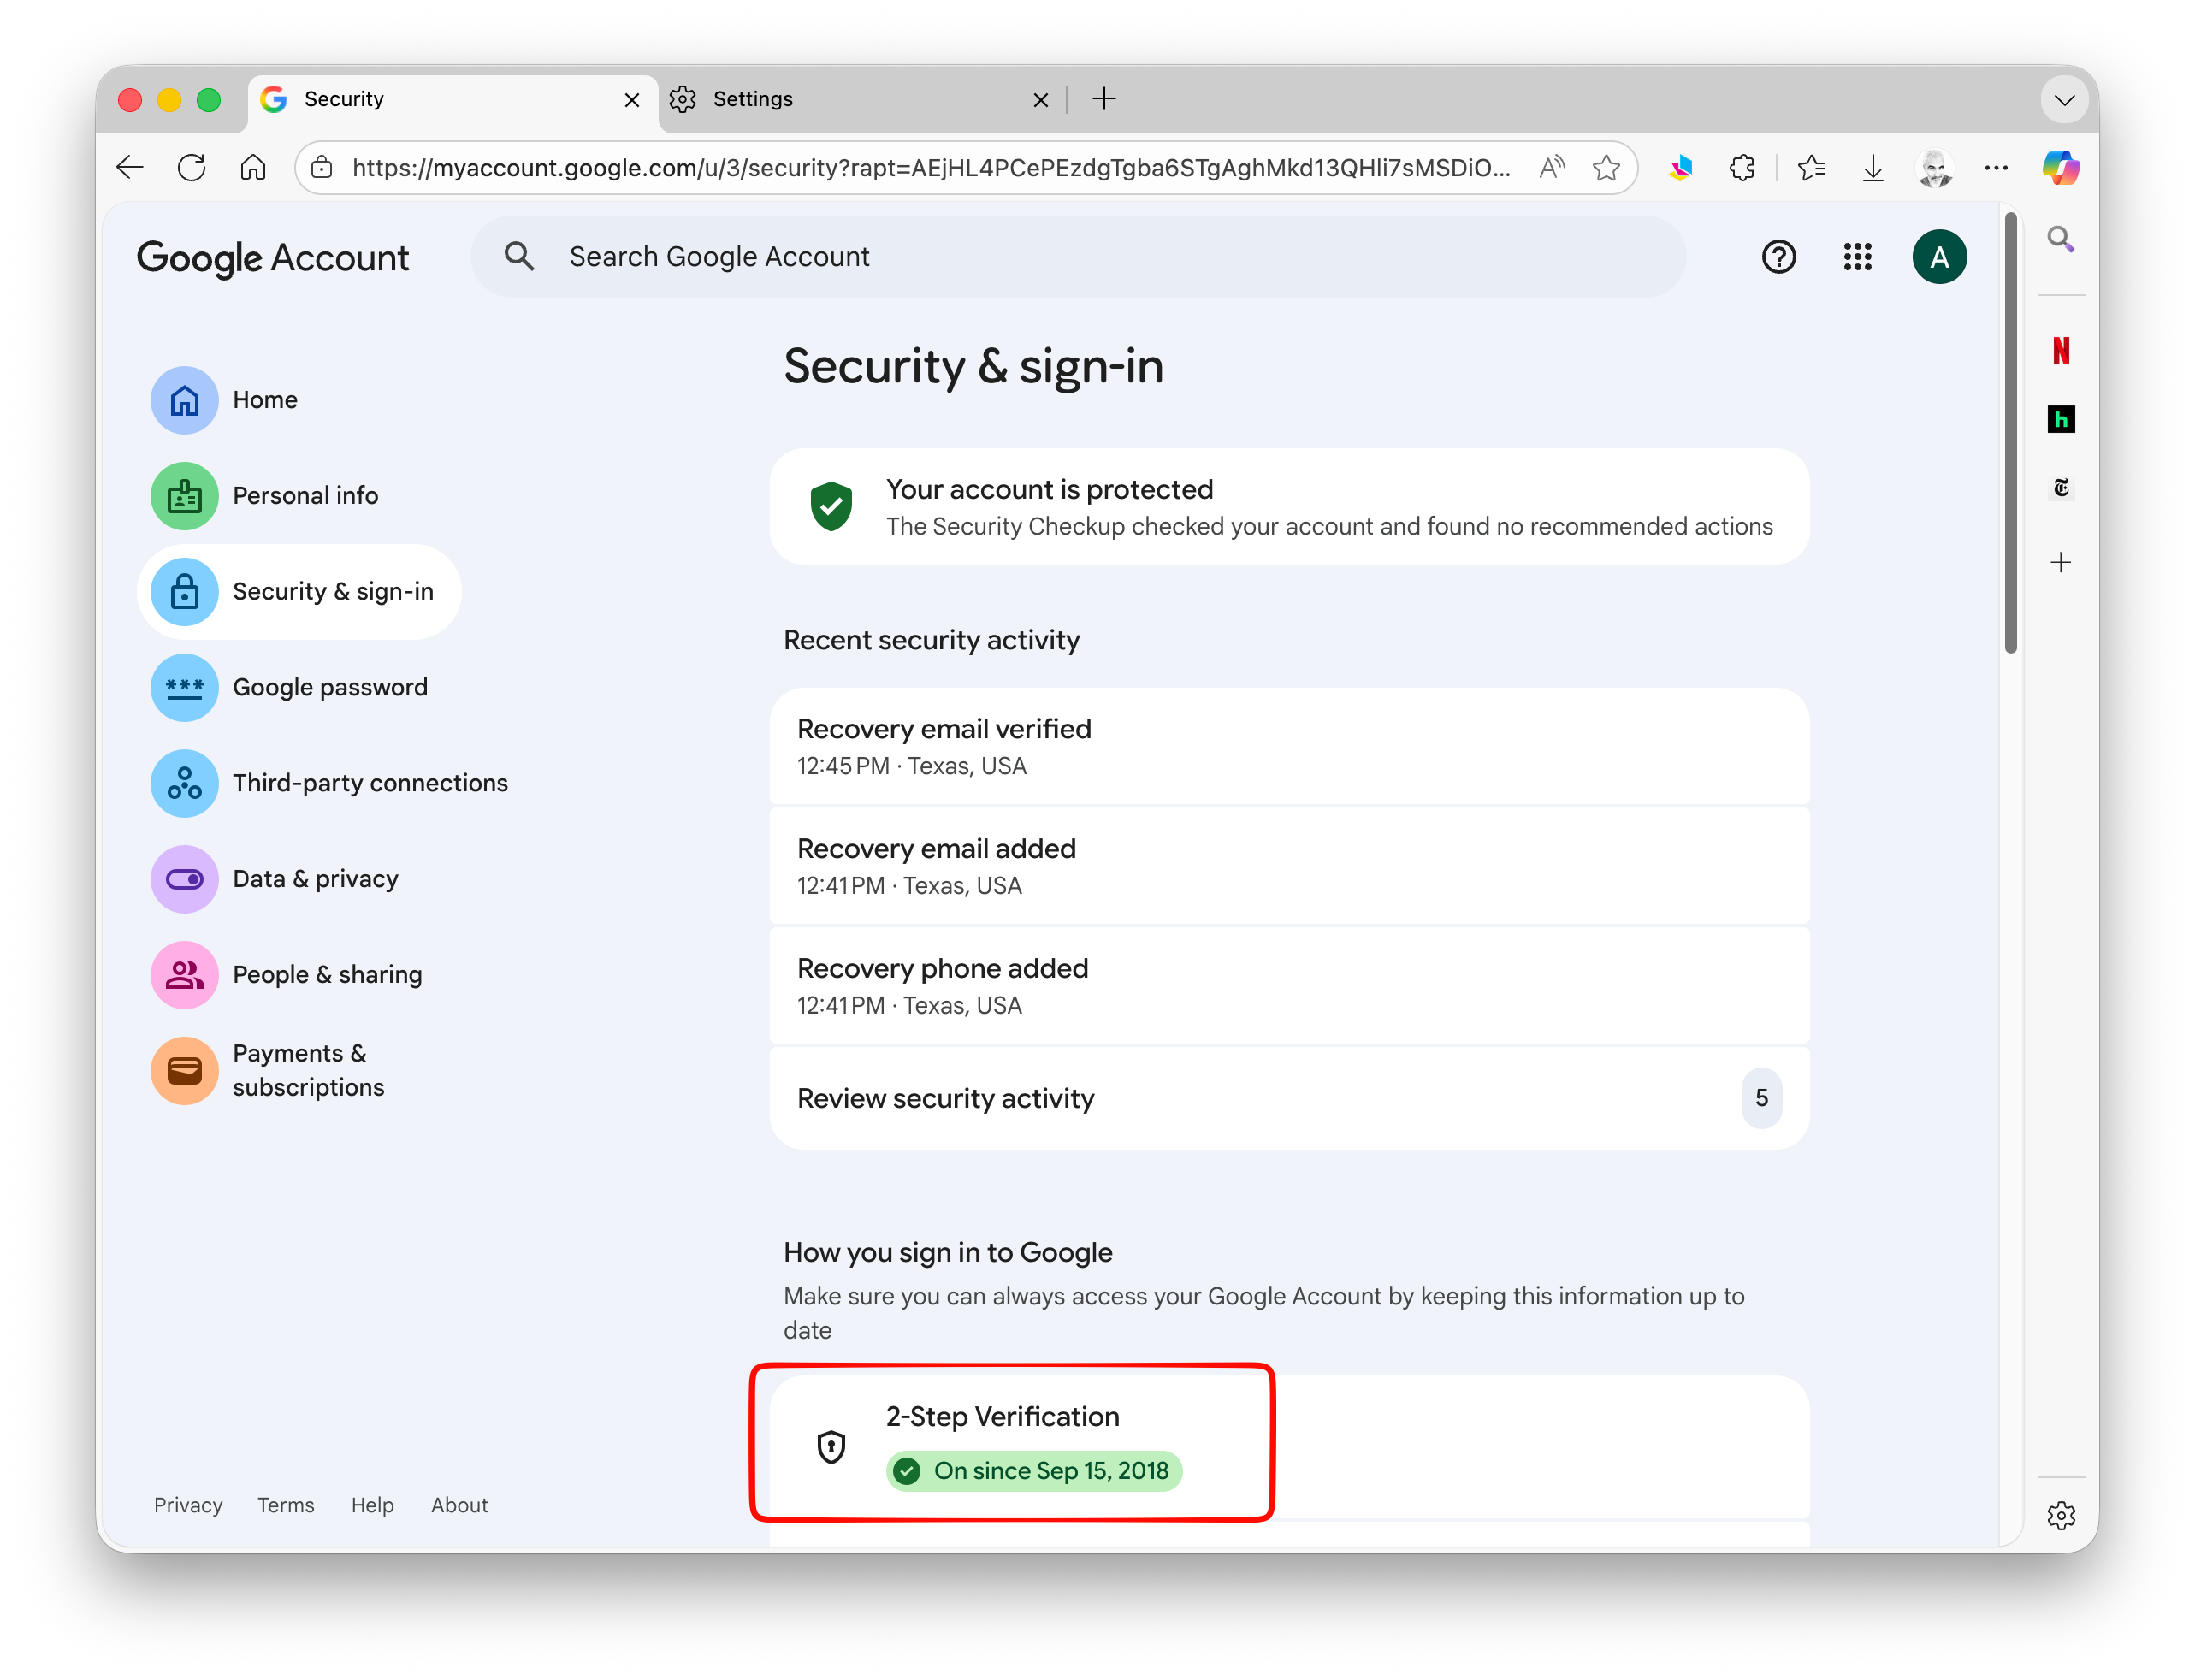
- Select “Security & sign-in”…

… and in the window that opens, scroll down to the section on “2-Step Verification” and click it.
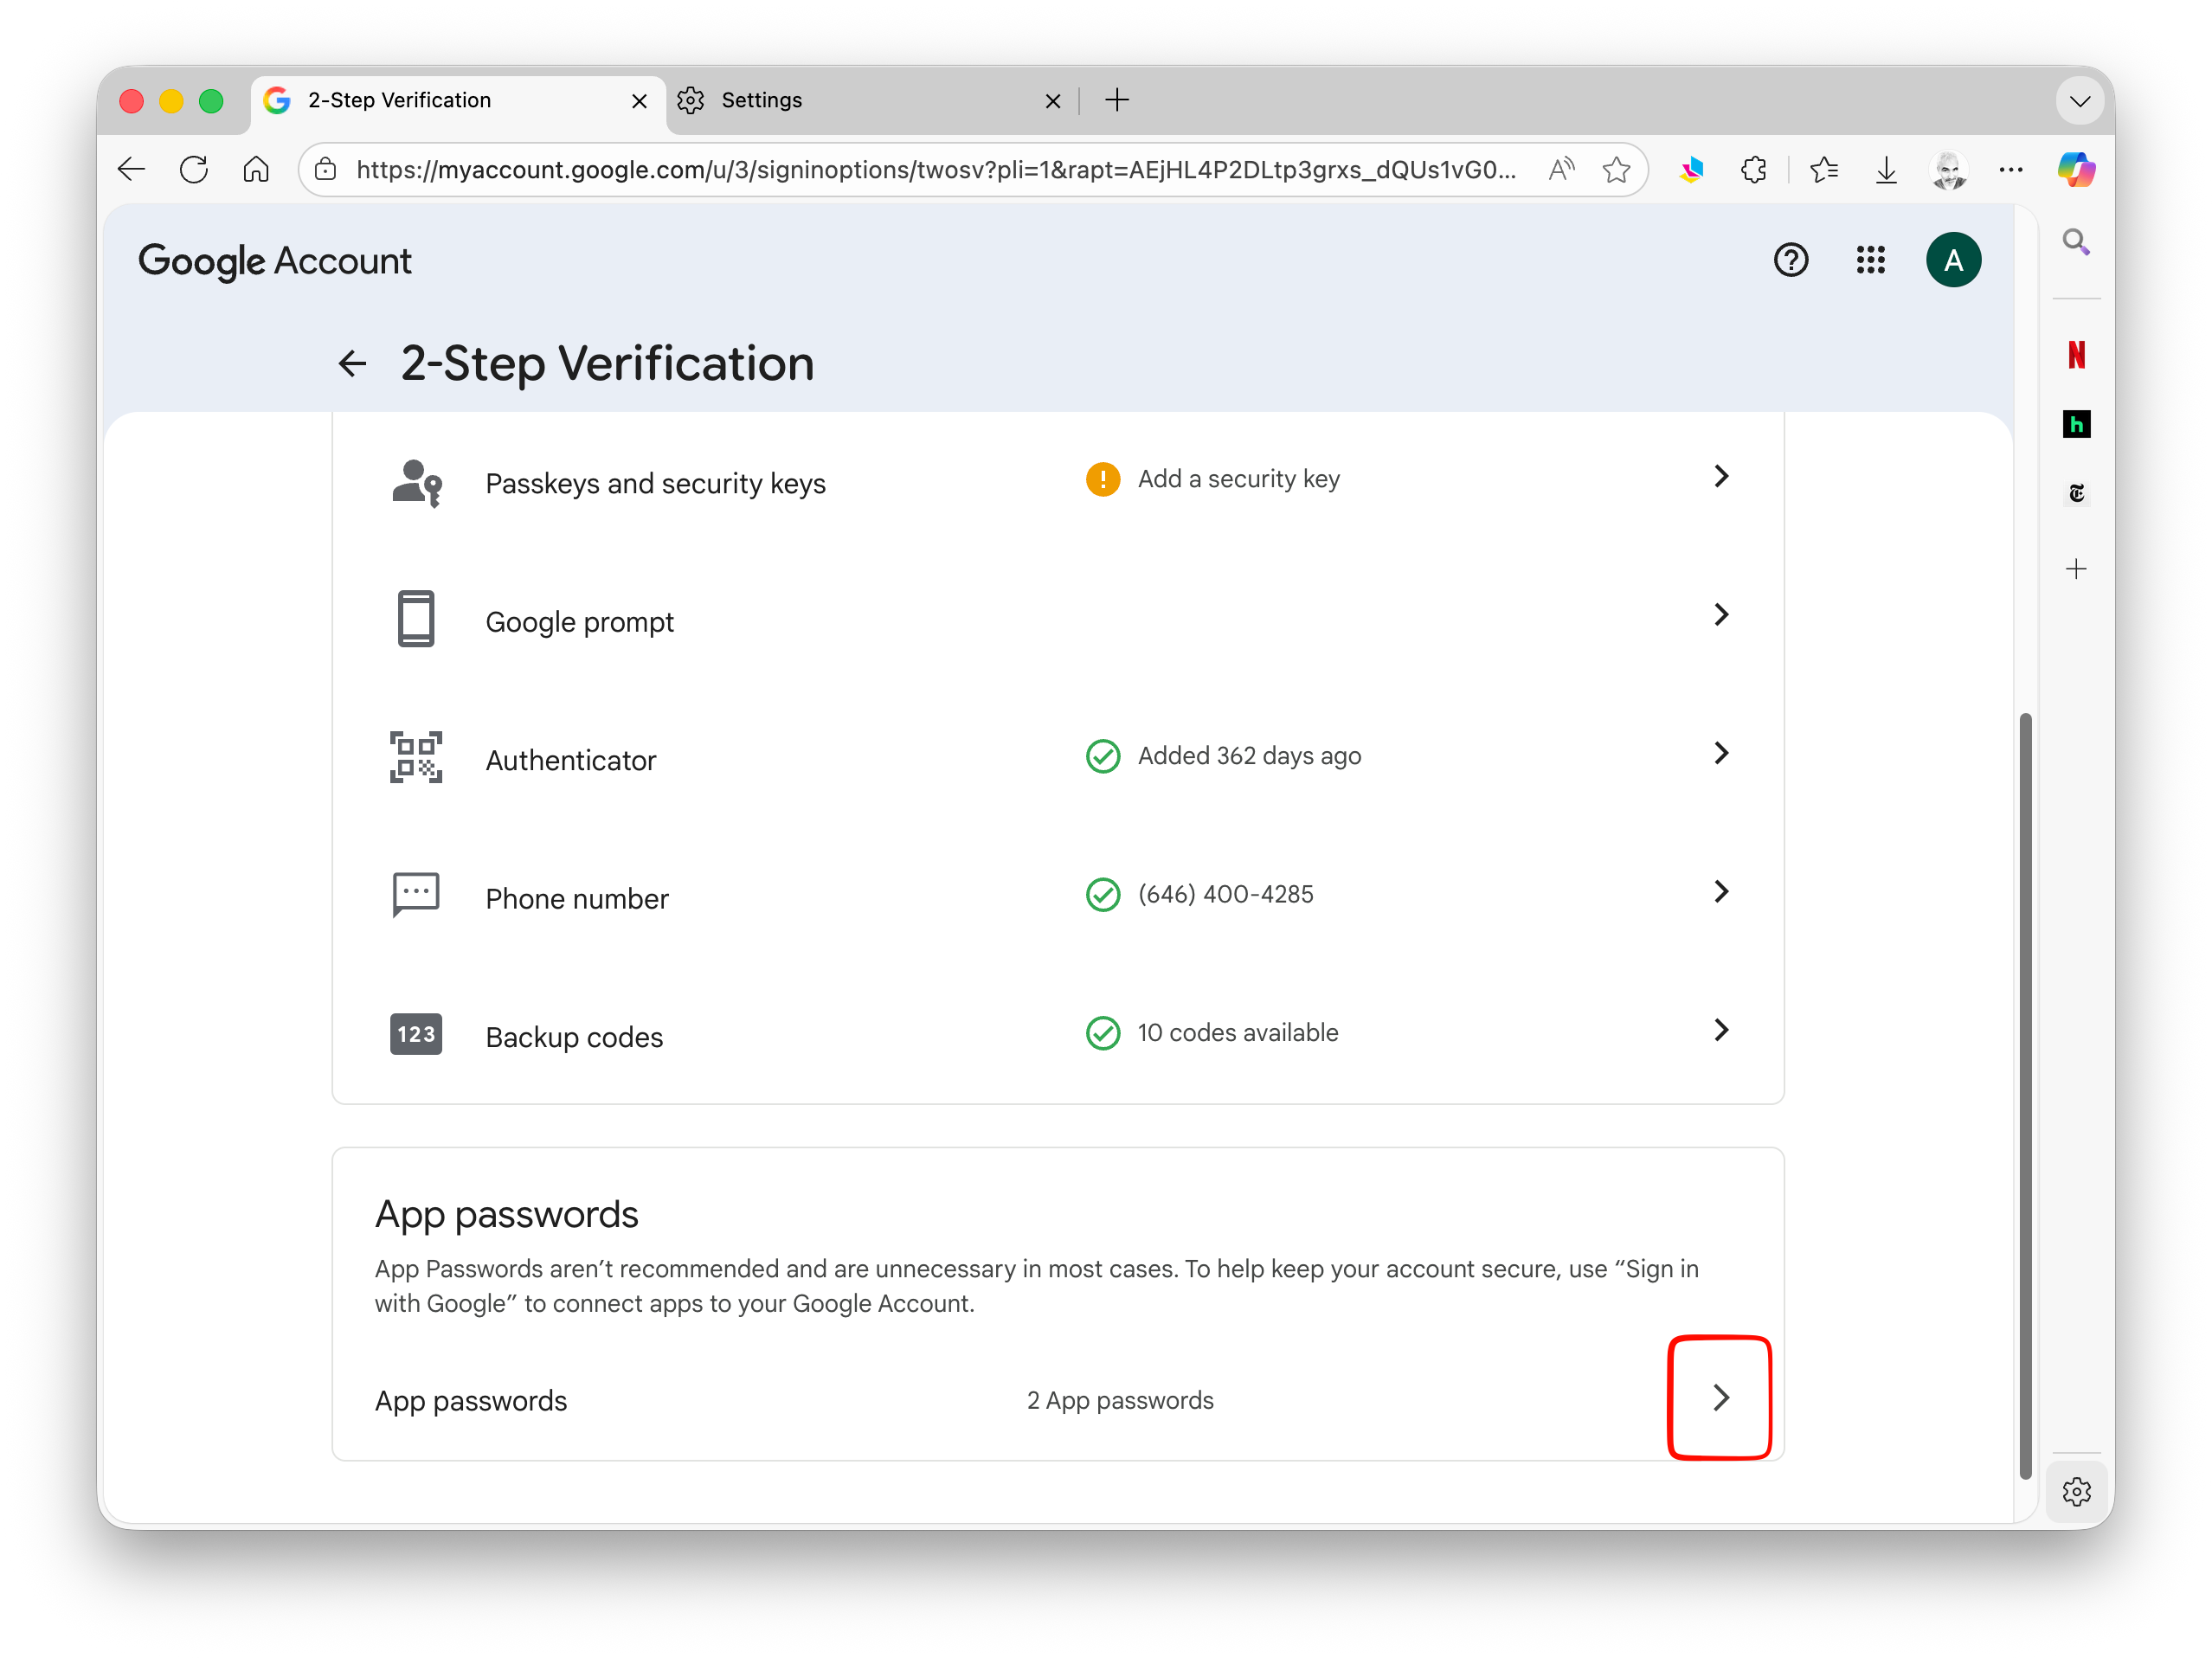
At this point, you may need to provide information to verify your identity, e.g., by entering a password and/or entering a code you receive from Google. Once you have verified your identity, scroll down to the bottom of the page to the section on “App passwords” and click the “App passwords” button.
- Create a “new app specific password” by typing a name for the password in the grey field and then click “Create”. The name does not matter, but here I have called it “R”.

Google will now create new 16-digit password that you can use in lieu of your actual Google password when sending emails via Gmail in the {emayili} and {blastula} functions below. Copy and save this code in a safe place!
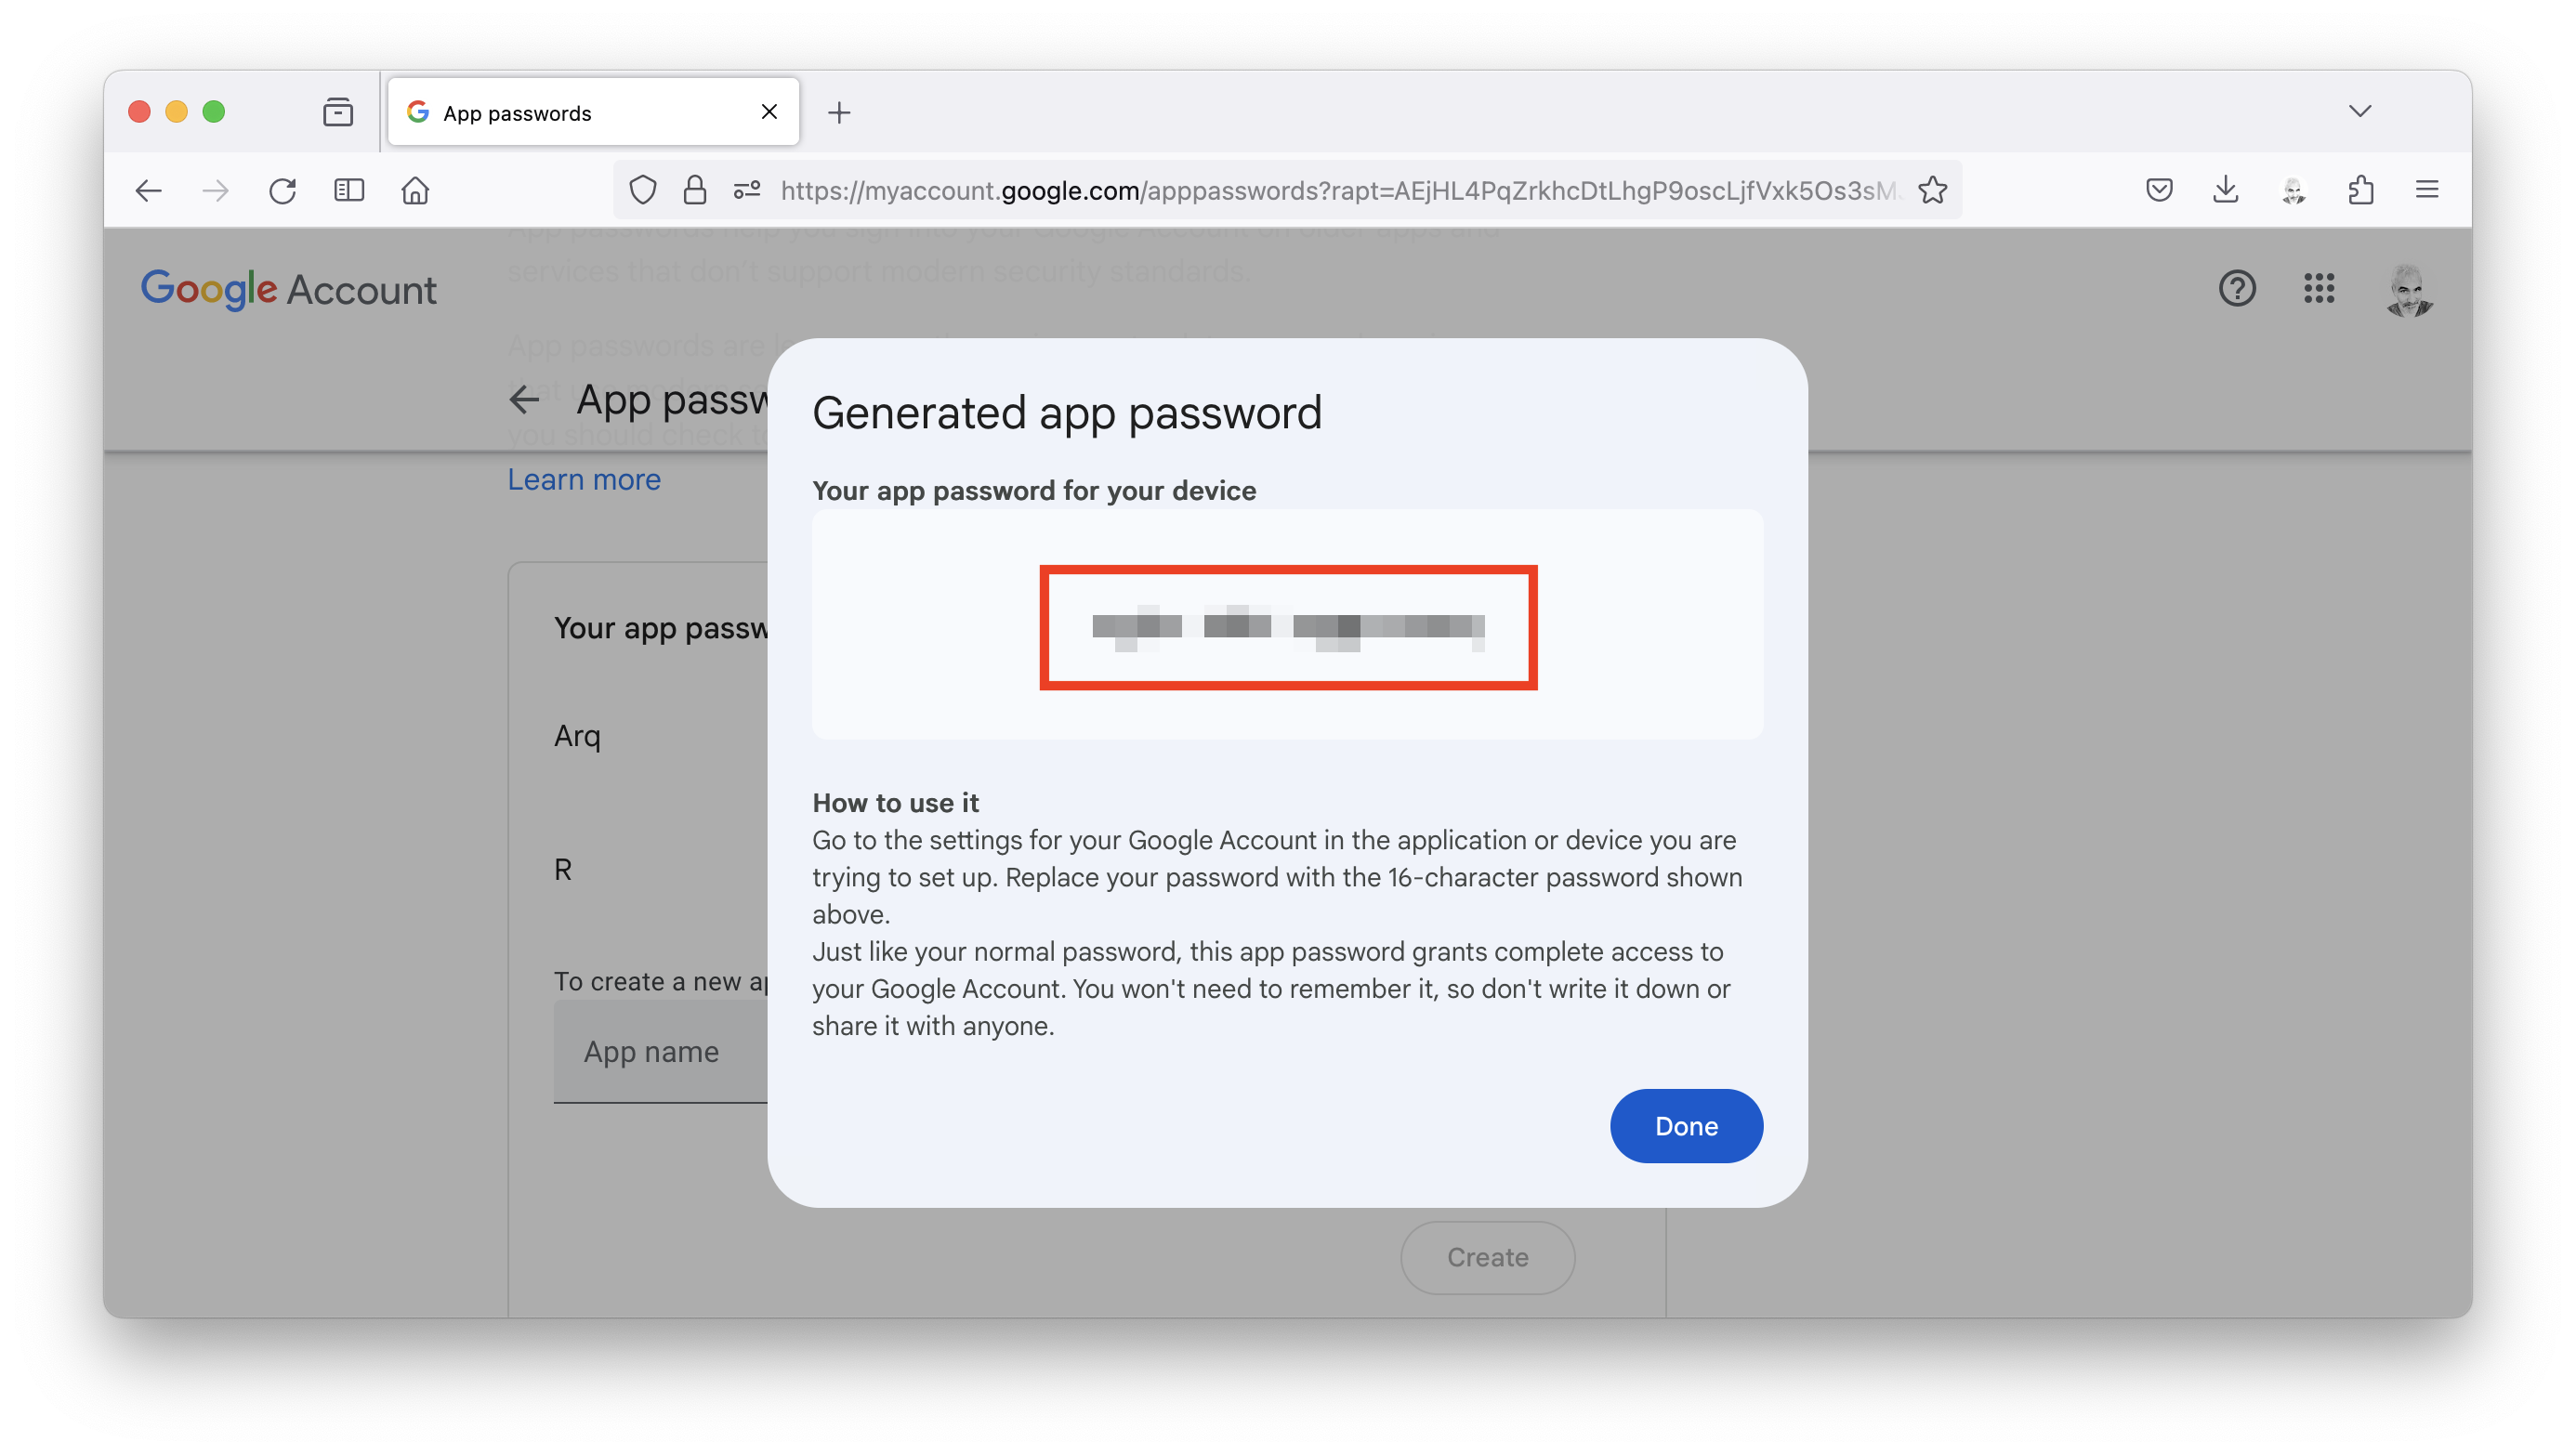
NOTE: The code will contain spaces between each set of 4 letters… regardless of whether you cut out or include those white spaces, your app password should function just the same.
- For ease, then set up a variable to hold your app password…
pwd_gmail <- "" # enter your app password between the quotation marksChallenge: Sending Emails
Sending an Email Using the {emayili} package
The {emayili} package makes sending simple text emails very easy.
Step 1
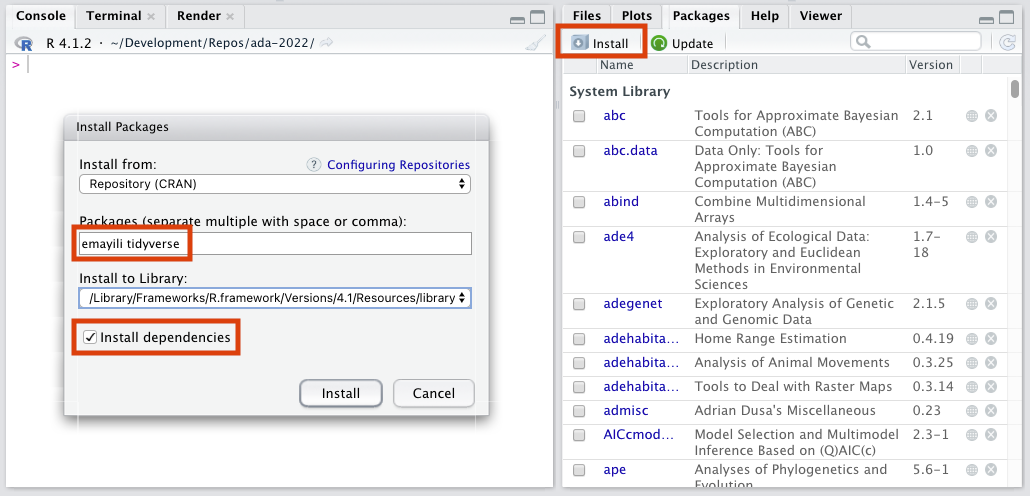
- Install the {emayili} and {tidyverse} packages.
Note that {tidyverse} is only needed if we are going to use the
%>%operator (see below).
We can do this at the R console prompt…
install.packages("emayili")
install.packages("tidyverse")

# or to install both packages together...

install.packages(c("emayili", "tidyverse"))
We can also do this by using the package manager in RStudio.
Step 2
- Load and attach these packages to the search path so you can call functions they contain.
library(emayili)
library(tidyverse)
NOTE: We can also use
require()in lieu oflibrary().
Step 3
- Create a new email “message” with the
envelope()function from the {emayili} package.
This function takes several intuitive arguments (from, to, subject, and text) that we can assign values to directly within the function using the = operator.
NOTE:
from=should typically be the email address you are sending the from, although many SMTP transactions will accept alternatives, such as just a name. You can also use a vector of email addresses for theto=argument to send a message to more than one recipient. Thefromandtoarguments are required…subjectandtextare optional.
message_gmail <- envelope(
  from = "anthony.difiore@utexas.edu",
  to = "anthony.difiore@gmail.com",
  subject = "Sending a message using {emayili}",
  text = "Hello! This is a plain text message sent to my personal Gmail account from my UT Gmail account."
)
NOTE: R essentially ignores all the whitespace (spaces and tab characters) and also allows you to have code continue from one line to the next. It is even pretty forgiving about where you put carriage returns, although it is good form to place them following a comma or before/after a parenthesis or brace.
Using {tidyverse} syntax, we can set up the same email as follows using the “pipe” operator (%>%):
message_gmail <- envelope() %>%
  from("anthony.difiore@utexas.edu") %>%
  to("anthony.difiore@gmail.com") %>%
  subject("Sending a message using {emayili}") %>%
  text("Hello! This is a plain text message sent to my personal Gmail account from my UT Gmail account.")
As of R version 4.1, we can alternatively use R’s “native” pipe operator, |>:
message_gmail <- envelope() |>
  from("anthony.difiore@utexas.edu") |>
  to("anthony.difiore@gmail.com") |>
  subject("Sending a message using {emayili}") |>
  text("Hello! This is a plain text message sent to my personal Gmail account from my UT Gmail account.")
The difference here is that we are first creating an empty “message” object and then “piping” that object using %>% or |> into different helper functions (from(), to(), etc.) to create the details of the message.
Step 4
- Create an SMTP (or “Simple Mail Transfer Protocol”) “server” object that includes details about how to send a message, i.e., by specifying the email service’s outgoing server host name, a communications port number to use, and user and password information for authenticating use of the server.
- SMTP transmission can often use any of several standard port numbers (25, 465, 587, and 2525), but 587 and 465 are the most commonly used and support TLS encryption. To use Google’s outgoing email server, set the host to “smtp.gmail.com” and the port to either 465 or 587.
NOTE: In the function below,
max_times=sets the number of attempts the function will make to send the message. The default (if the argument is omitted) is 5, but I have set it to 1 to exit quickly if the server is not contacted. Forusername=enter your login ID for the service you are sending from, and forpassword=either use the variable you set up above to hold the “app password” for your Google account, or enter your password directly here, in quotation marks it, in lieu of the variablegmail_pwd
smtp_gmail <- server(
  host = "smtp.gmail.com",
  port = 465,
  max_times = 1,
  username = "anthony.difiore@utexas.edu",
  password = pwd_gmail
)
Alternatively, you can use the gmail() function to create a Gmail server object more easily…
smtp_gmail <- gmail(
  username = "anthony.difiore@utexas.edu",
  password = pwd_gmail
)
Step 5
- Send your message by passing it as an argument to the server object. To confirm that things are working, send a message to yourself and then CHECK YOUR EMAIL to confirm that you receive the message. A copy of the message should appear in the Sent folder of your email client!
# send using Google's Gmail server...
smtp_gmail(message_gmail, verbose = TRUE)
Next Steps?
Use the RStudio Help tab to browse the documentation associated with the {emayali} package to see how you can customize your message, e.g., by adding cc or bcc arguments, by using a different “reply to” address, by adding attachments, or by encrypting your message.
Sending an Email using the {mailR} package
The {mailR} package also allows you to easily send simple emails with a single function, send.mail(). Here, we need to specify details about the SMTP server more explicitly than if we use {emayili} (above) or {blastula} (below).
Step 1
- Install the {mailR} package.
install.packages("mailR")Step 2
- Load the {mailR} package.
library(mailR)Step 3
Create and send the email
- Using Google’s Gmail server…
- To use the Gmail server with ports other than 587 (e.g., 465) the argument
ssl=must be set to TRUE, which initiates a secure connection and allows required encryption - If port 587 is used, either the argument
ssl=ortls=should be set to TRUE
- To use the Gmail server with ports other than 587 (e.g., 465) the argument
send.mail(
  from = "anthony.difiore@utexas.edu",
  to = "anthony.difiore@gmail.com",
  subject = "Sending a message using {mailR}",
  body = "Hello! This is a plain text message sent from a Gmail account.",
  smtp = list(
    host.name = "smtp.gmail.com",
    port = 587,
    user.name = "anthony.difiore@utexas.edu",
    passwd = pwd_gmail,
    ssl = TRUE
  ),
  authenticate = TRUE,
  send = TRUE
)
Sending an Email using the {blastula} package
The {blastula} package allows us to create and send more complex HTML and formatted emails using markdown. Using it is a bit more complicated (but more flexible) than using the procedures above.
Similar to {emayili}, {blastula} provides two main functions: [1] compose_email() for constructing various parts of a message and [2] smtp_send() for specifying email server settings and passing the message to the server to send. However, {blastula} also adds in some helper functions that allow you to store authentication information in either a separate “credentials” text file that is referenced when you run the function to send a message or in your computer’s keychain. {blastula} also stores some default information on commonly-used email providers and services (e.g., on Google’s Gmail server), which may make configuring the server setup easier than using {emayili} or {mailR}.
Step 1
- Install the {blastula} package.
install.packages("blastula")Step 2
- Load the {blastula} package.
library(blastula)Step 3
- Create a new email “message” with the
compose_email()function.
This function takes several intuitive arguments that we can assign values to directly within the function.
# Compose the message
message <- compose_email(
  body = "Hello! This is a simple HTML message."
)

# Preview the message.
# This will open the HTML message in a browser window or in the RStudio Viewer tab
message
We can add some formatting to our email by using the md() function and markdown syntax. Here, we pipe (%>% or |>) the body argument to the md() function to convert it to markdown.
# Compose the message
message <- compose_email(
  body = "# Hello!\nThis is a simple **HTML** message with some *markdown* syntax." |> md()
)

# Preview the message
message
We can also spice up our email with an image from a local file. Here, I use an image stored in a folder called “img” inside the my current working directory.
# Create text as html
text <- "# Hello!\nThis is a simple **HTML** message with some *markdown* syntax... and a cool picture!"

# Create image as html
image <- add_image(
  file = "img/batnet.jpg",
  width = 300, align = "center"
)

# Compose the message
message <- compose_email(
  body = c(text, image) |> md()
)

# Preview the message
message
Step 4
- Create a credentials file.
The following code block will create a text file (in JSON format) in the current working directory that contains default information for your outgoing mail server, e.g., Google’s Gmail server (host = "smtp.gmail.com"), along with your email address and your password. When you run the following lines of code, you will be asked to enter your password, which will then be stored in the credentials file. For a Gmail account, you can use the app password you created above.
NOTE: Be aware that if you create a credentials file like this, your password will be stored, unencrypted, in the file you create!
# credentials file for a Gmail account
create_smtp_creds_file(
  file = "my_gmail_creds.txt",
  user = "anthony.difiore@utexas.edu",
  provider = "gmail"
)NOTE: If you omit the
provider=argument, you should then pass thehost=,port=, anduse_ssl=arguments yourself to thecreate_smtp_creds_file()function. Theuse_ssl=argument allows the use of STARTTLS, which initiates secured (encrypted) TLS or SSL connection, which many email servers require.
Step 5
- Send the message via STMP using a credentials file.
# send using Google's servers...
smtp_send(
  email = message,
  from = "anthony.difiore@utexas.edu",
  to = "anthony.difiore@gmail.com",
  subject = "Sending a message using {blastula} and a credentials file",
  credentials = creds_file(file = "my_gmail_creds.txt")
)
Step 6
- We could also send the message by specifying our credentials manually within the
smtp_send()function.
The following will prompt us for our password to send the message:
# send using Google's servers...
message |> smtp_send(
  from = "anthony.difiore@utexas.edu",
  to = "anthony.difiore@gmail.com",
  subject = "Sending a message using {blastula} and entering credentials manually",
  credentials = creds(
    user = "anthony.difiore@utexas.edu",
    provider = "gmail"
  )
)
Sending an Email using the {sendmailR} package
The {sendmailR} is yet another that you can use to send emails from R.
install.packages("sendmailR")
library(sendmailR)
sendmail(
  from = "anthony.difiore@utexas.edu",
  to = "anthony.difiore@gmail.com",
  subject = "Sending a message using {sendmailR}",
  msg = "Hello! This is a plain text message sent to my personal Gmail account from my UT Gmail account.",
  engine = "curl",
  engineopts = list(username = "anthony.difiore@utexas.edu", password = pwd_gmail),
  control = list(smtpServer = "smtp://smtp.gmail.com", smtpPortSMTP = 587)
)
# can also include the port as part of the smtpServer argument...
# e.g., `control = list(smtpServer="smtp://smtp.gmail.com:587")`
Next Steps?
Again, use the RStudio Help tab to browse the documentation associated with the {blastula} package to see how you can customize your message, e.g., with attachments.
Even More Next Steps?
Finally, it is a bit more complicated, but note that we can also use the {keyring} package along with {blastula} to set up a credentials “key” in our computer’s keychain and refer to that to specify our credentials for sending a message. When you create the keys, you will be asked to provide your password.
install.packages("keyring")library(keyring)# create a Gmail key with a user-specified name, stored with the `id=` argument
create_smtp_creds_key(
id = "my_gmail_key",
user = "anthony.difiore@utexas.edu",
provider = "gmail",
overwrite = TRUE # this argument is only needed if you have an existing key
)# View all keys
view_credential_keys()# send a message with credentials from a keychain using Google's servers...
message |>
smtp_send(
from = "anthony.difiore@utexas.edu",
to = "anthony.difiore@gmail.com",
subject = "Sending a message using {blastula} and credentials from a keychain",
credentials = creds_key(id = "my_gmail_key")
)Clean-Up
# delete all keys
delete_all_credential_keys()
Challenge: Sending an SMS or MMS Text
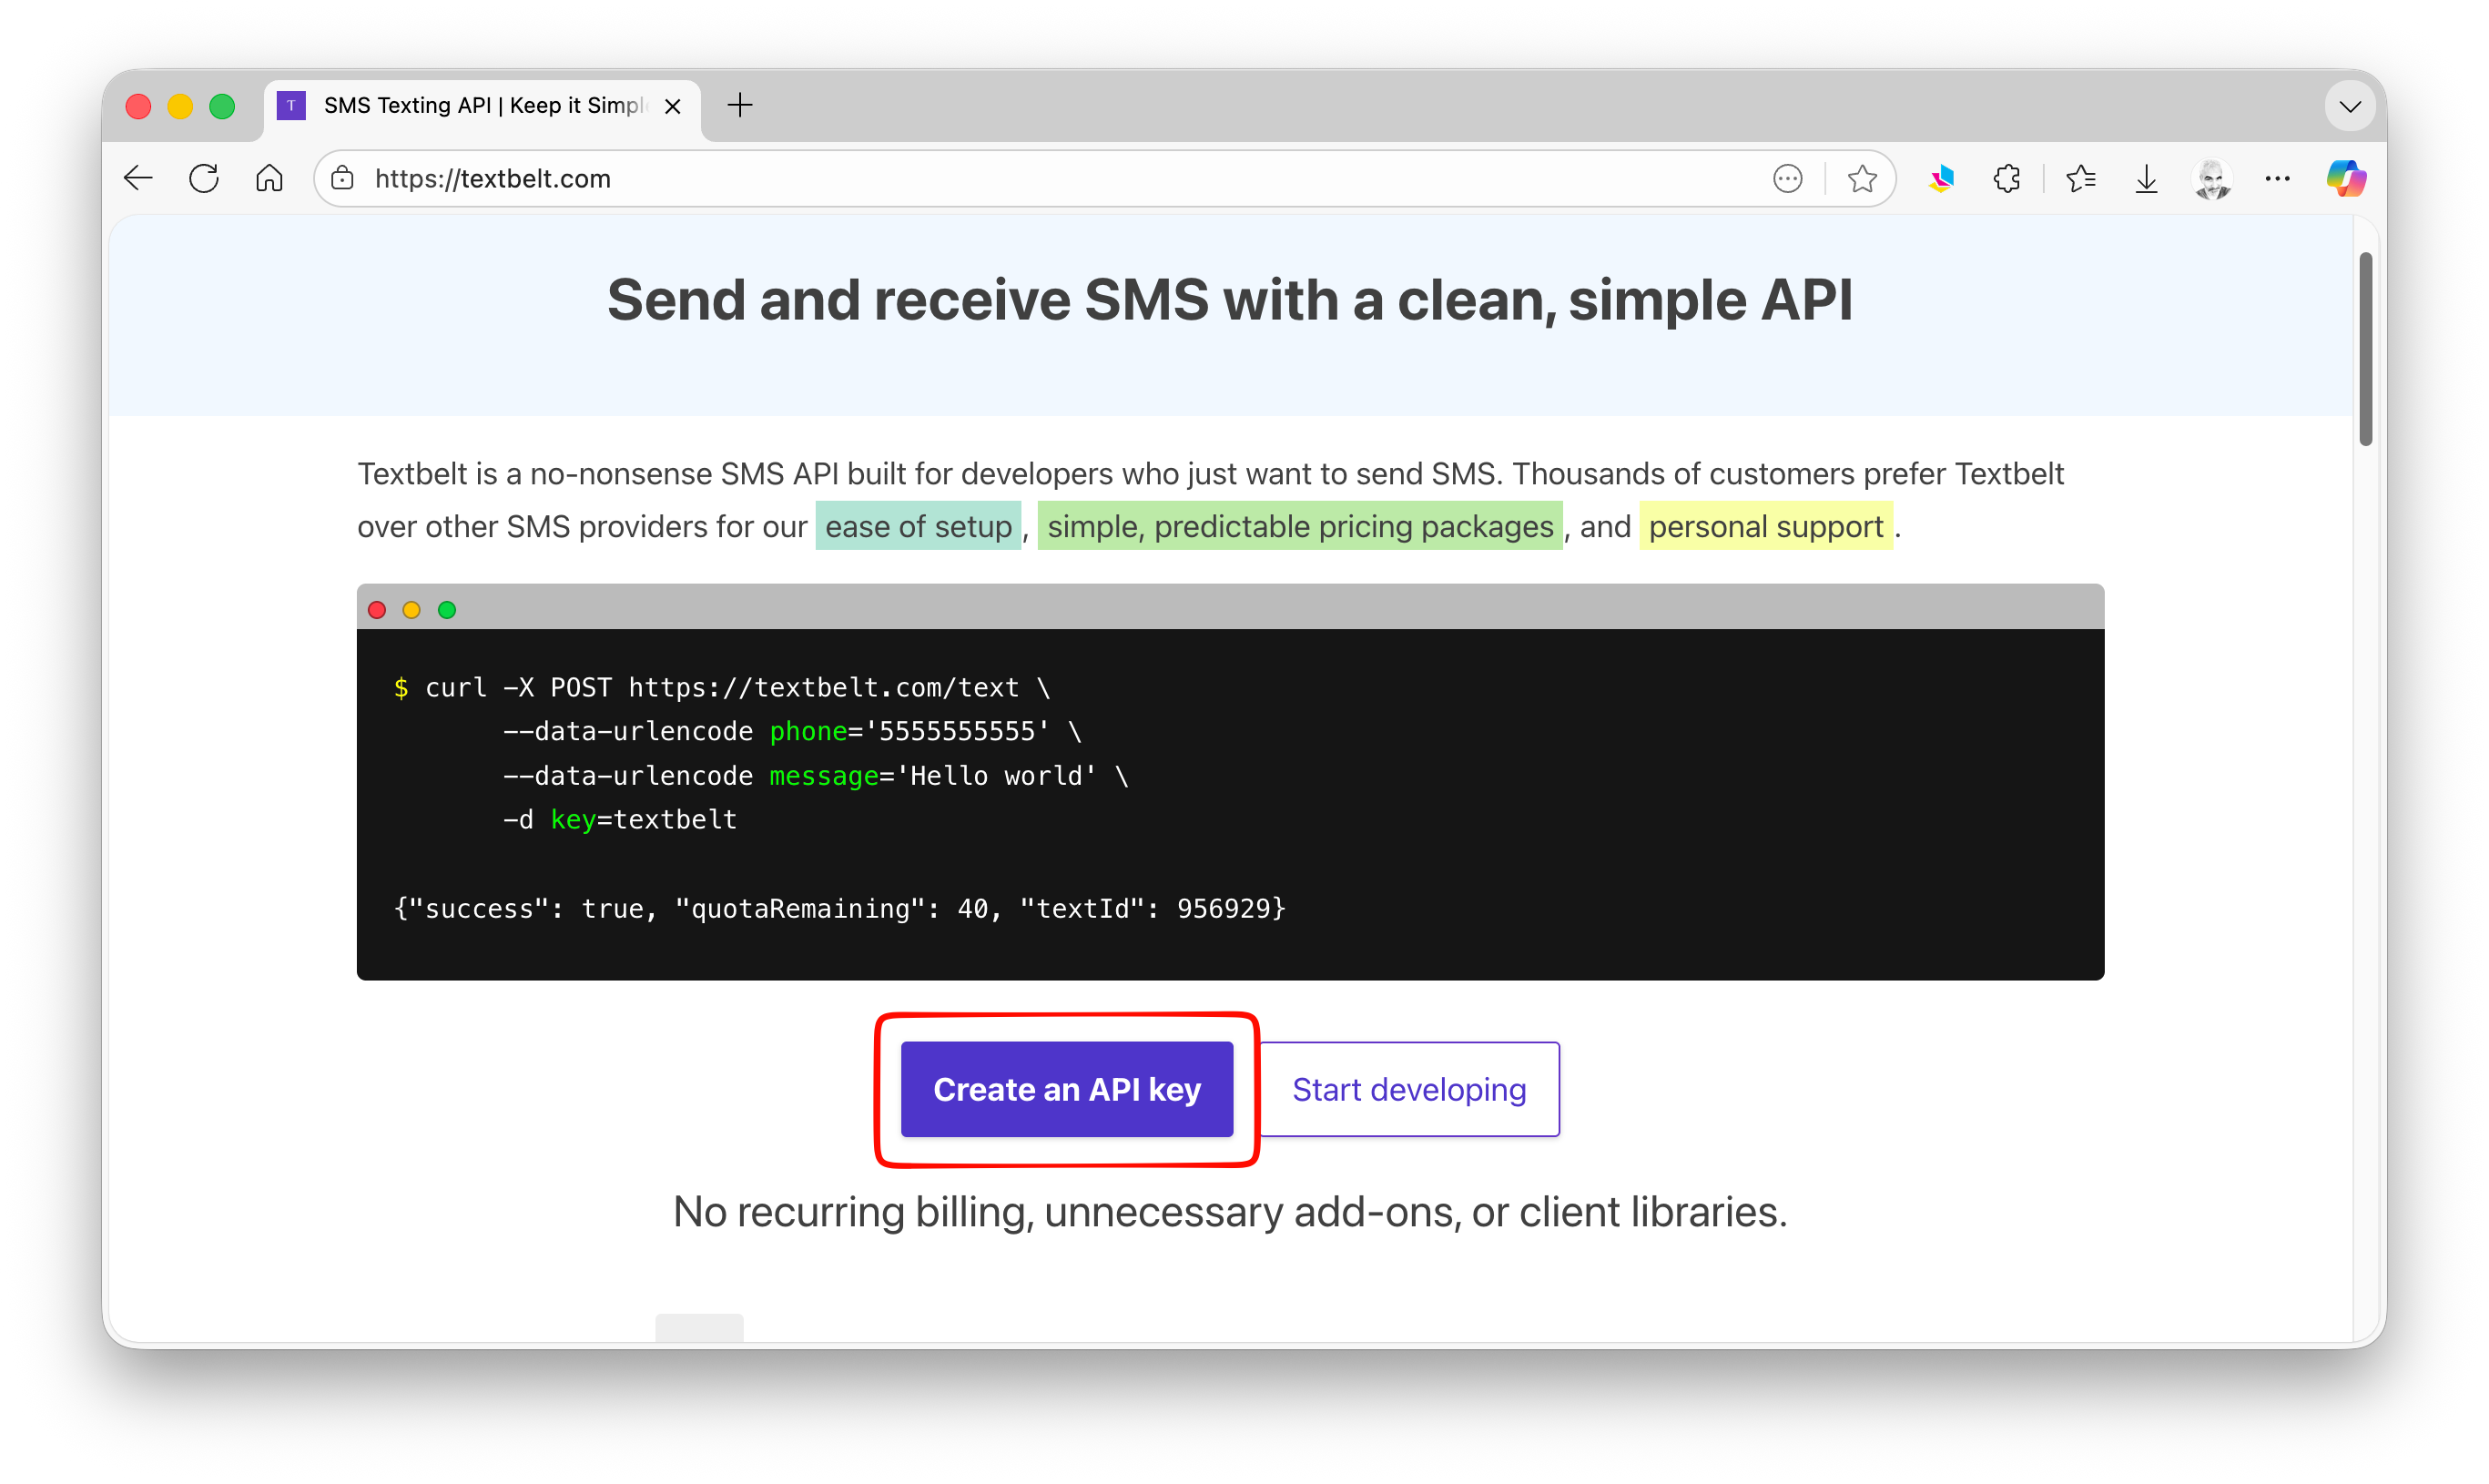
With a little bit of setup, it is possible to send text messages from R as well. There are two basic ways this can be done. One way is by using a package like {emaliyi} or {blastula} to send the message to a cell carrier’s servers, which then passes that on via SMS using an email-SMS converter. Some carriers are picky, however, about passing on what their algorithms may perceive as spam messages. The other way is to use a paid text messaging service API (application programming interface) to create and send messages. One such paid service is Textbelt, which is easy to set up and has a simple pricing package.
Using Textbelt to send text messages
- Go to https://textbelt.com/…
- Select “Create an API key”…
- Purchase a desired number of credits…
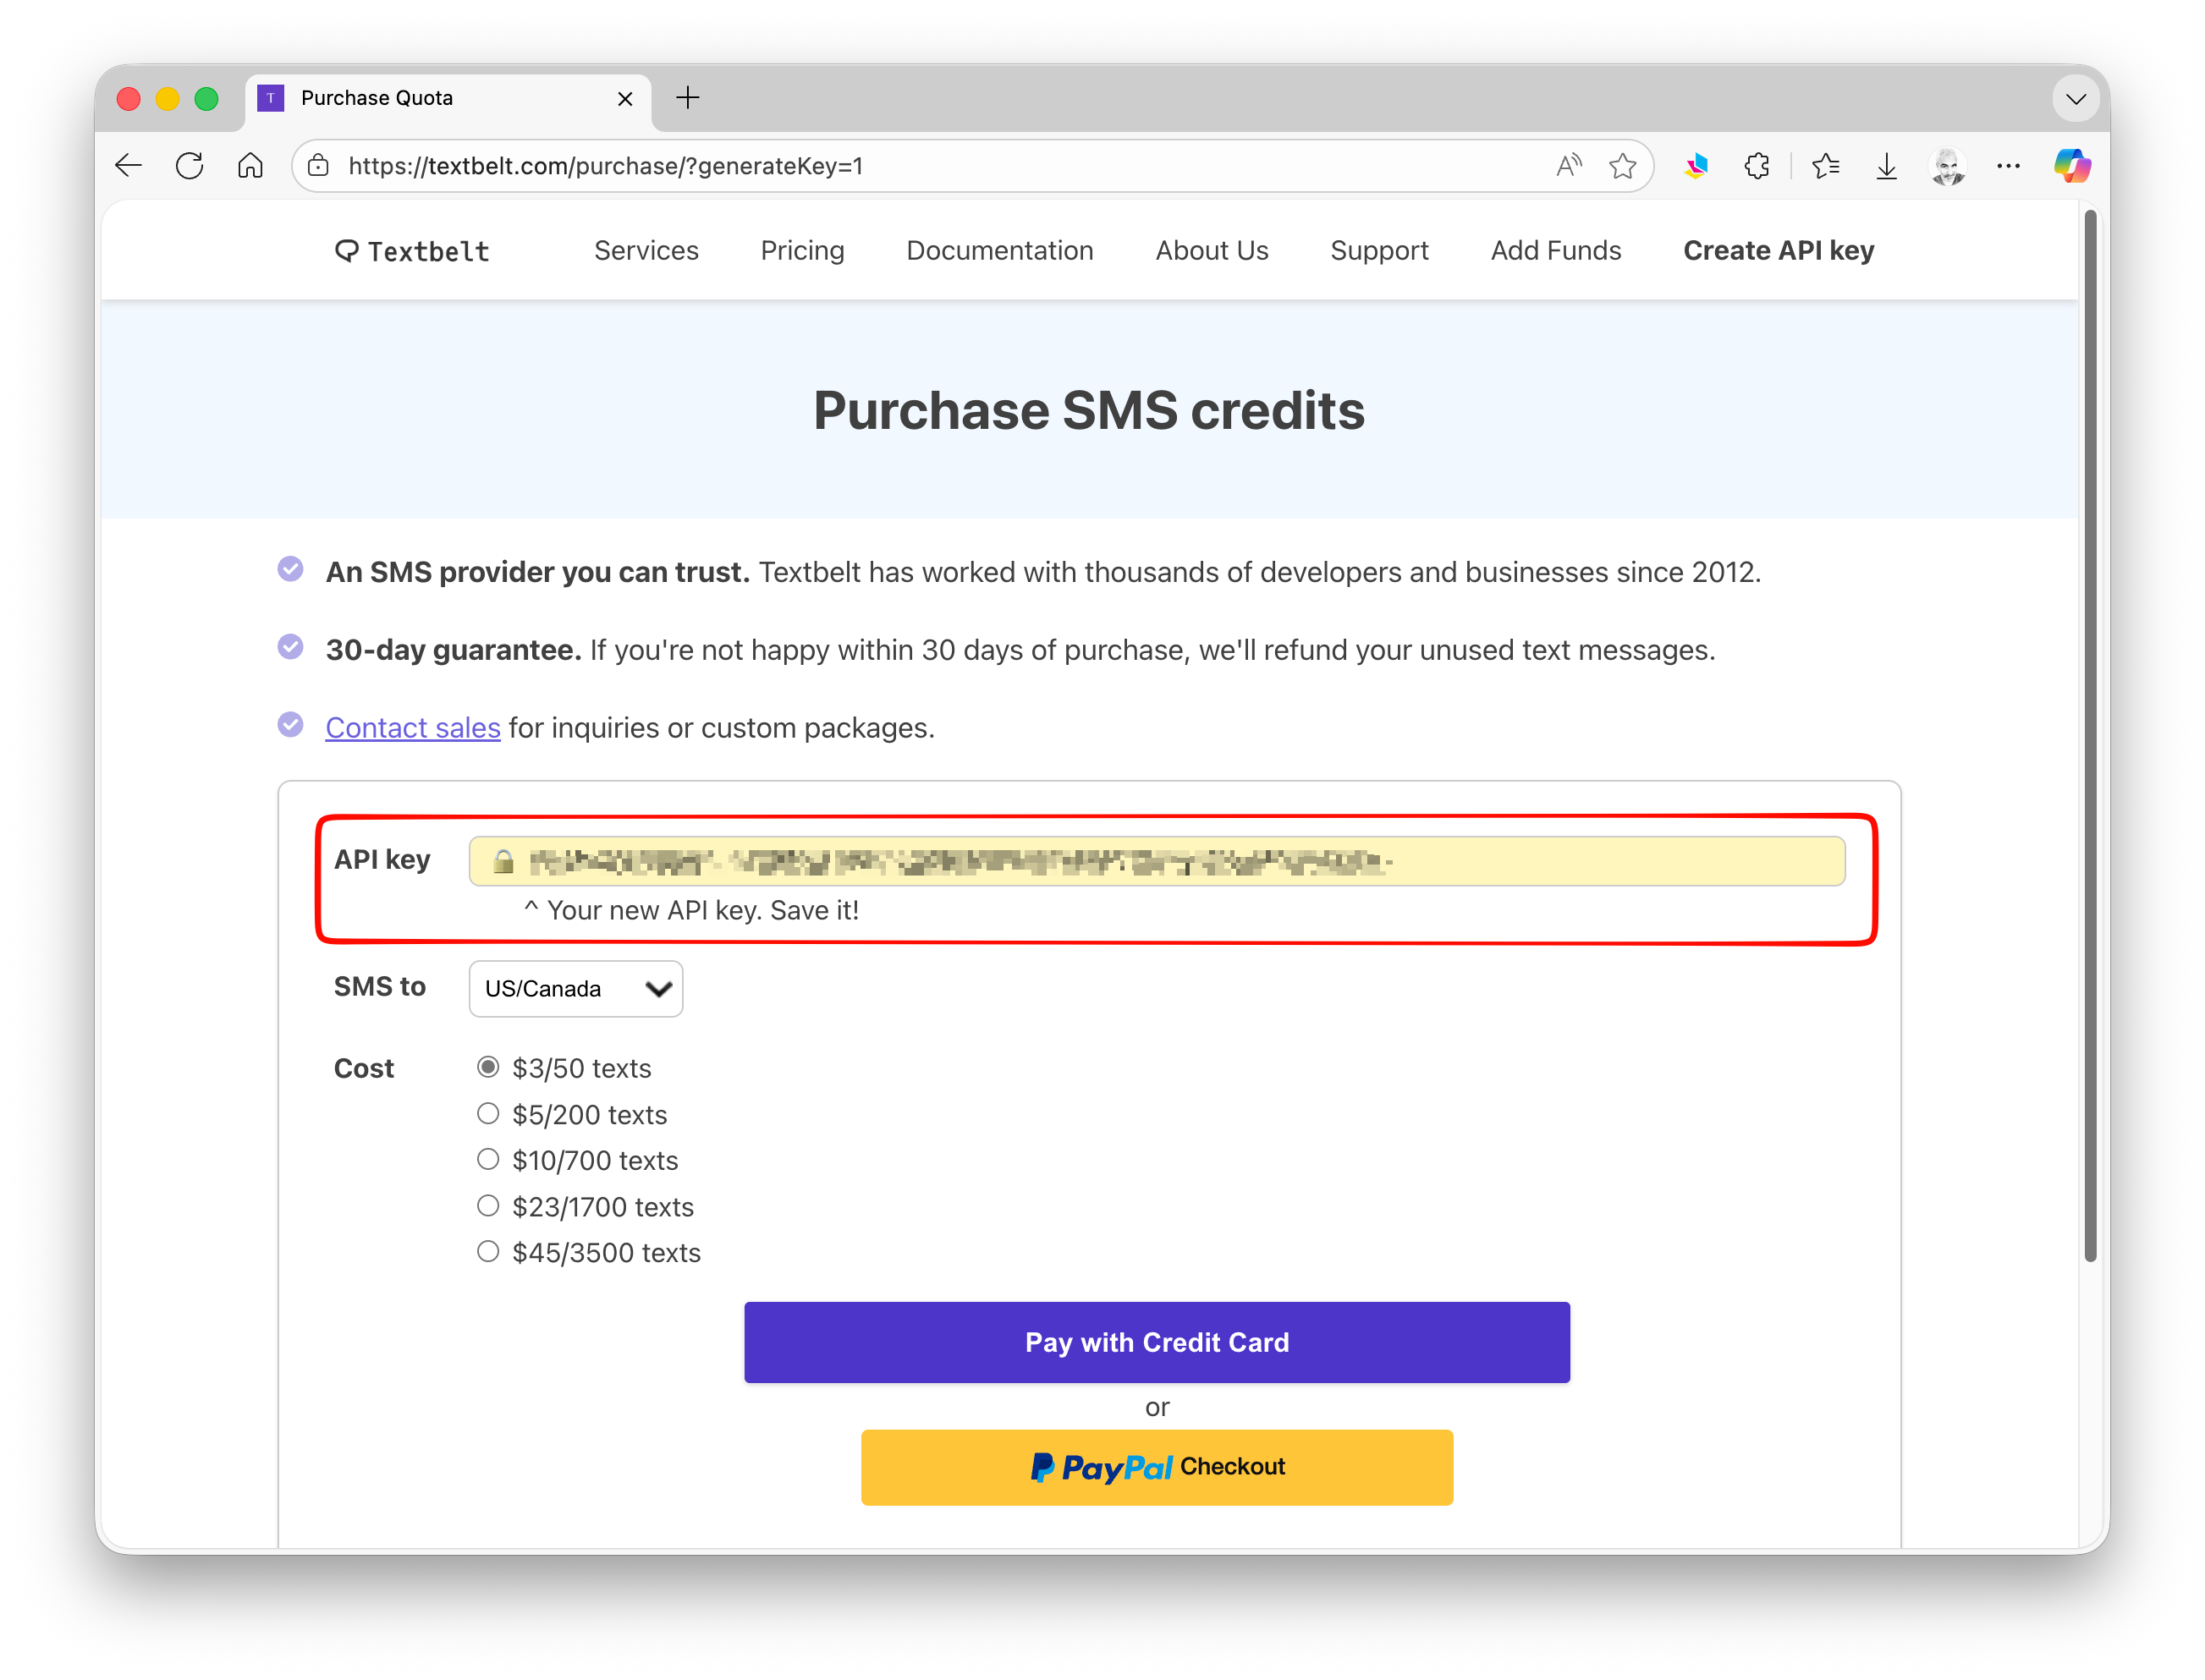
- And save the key!
key <- "" # enter your Textbelt API key between the quotation marksTo send messages, we will use the {httr} package, which includes functions for working with URLs and sending HTTP requests over the web.
- Install and attach the {httr} package.
install.packages("httr")library(httr)We can set up a simple function to create an SMS message. It takes as arguments a phone number, a message, and an API key. It then uses the POST() function to create and send a HTTP “POST” request to Textbelt’s servers that consists of a URL and a POST body.
NOTE: If we set verbose = TRUE, we will see what response is sent from Textbelt’s servers…
# simple message
send_textbelt_sms <- function(phone, message, api_key = key, verbose = FALSE) {
  url <- "https://textbelt.com/text"
  res <- POST(
    url,
    body = list(
      phone = phone,
      message = message,
      key = api_key
    ),
    encode = "form"
  )
  if (verbose) {
    print(res)
  }
  stop_for_status(res)
  result <- content(res, "parsed")
  # Print delivery status
  if (result$success) {
    cat("✅ SMS sent successfully!\n")
  } else {
    cat("❌ SMS failed: ", result$error, "\n")
  }
  return(result)
}
We can also create a version of this function that does the same thing, but also sends a follow–up request to query more information about whether the text was successfully delivered to the recipient.
send_textbelt_sms_log <- function(phone, message, api_key = key, verbose = FALSE, check_status = TRUE, poll_interval = 5, max_checks = 6) {
  # Step 1: Send SMS
  url <- "https://textbelt.com/text"
  res <- POST(
    url,
    body = list(
      phone = phone,
      message = message,
      key = api_key
    ),
    encode = "form"
  )
  if (verbose) {
    print(res)
  }
  stop_for_status(res)
  result <- content(res, "parsed")
  log <- list(
    initial_response = result,
    status_checks = list()
  )
  if (!result$success) {
    cat("❌ SMS failed: ", result$error, "\n")
    return(log)
  }
  cat("✅ SMS sent successfully!\n")
  # Step 2: Poll for delivery status (paid keys only)
  if (check_status && !is.null(result$textId)) {
    status_url <- paste0("https://textbelt.com/status/", result$textId)
    for (i in 1:max_checks) {
      Sys.sleep(poll_interval)
      status_res <- GET(status_url)
      status <- content(status_res, "parsed")
      log$status_checks[[i]] <- status
      cat(sprintf("Status check %d: %s\n", i, status$status))
      if (status$status == "DELIVERED") {
        cat("✅ Message delivered!\n")
        break
      }
    }
  }
  return(log)
}
Example usage:
phone <- "+16464004285"
message <- "This is a test of SMS from R using Textbelt"

status <- send_textbelt_sms(phone, message, key)
status$success # returns whether text was sent successfully
status$textID # returns textID
status$quotaRemaining # returns number of texts remaining

status <- send_textbelt_sms_log(phone, message, key)
status$initial_response$success # returns textID
status$initial_response$textId # returns textID
status$initial_response$quotaRemaining # returns quota remaining
Sending text via curl
Incidently, because this Textbelt API is based on standard HTTP requests, you can also use a terminal and the curl program to to send texts in a similar fashion, bypassing R. In the examples below, simpley replace phone number, message, and apikey with the relevant variable values (inside of the single 's).
$ curl -X POST https://textbelt.com/text \
       --data-urlencode phone='phone number' \
       --data-urlencode message='text message' \
       -d key='apikey'
Checking the status of a sent message via {curl}
Use /status/
$ curl https://textbelt.com/status/textIDChecking your quota via curl
Use /quota/
$ curl https://textbelt.com/quota/apikeyTesting your API key with {curl}
If you want to just validate your key without actually using your text quota, append “_test” to your key and you will receive a response from the /text endpoint confirming that a text would send, but it will not consume your credits.
$ curl https://textbelt.com/quota/apikey_test